- Gamingservices - ABTestSample #8 RemoteConfig 로드2023년 03월 02일
- 개양반
- 작성자
- 2023.03.02.:27
1. 오늘 알아볼 내용
저번 시간에는 Override를 설정해서 유저가 계정을 만들때 랜덤으로 하나의 그룹에 속하게 만들었습니다. 이번 시간에는 클라이언트에서 유저의 RemoteConfig Key 값을 로드하고 유저가 속한 그룹을 UI에 표시하도록 만들겠습니다.
- 로그인이 완료되면 GamingServices에 RemoteConfig Key값 로드 요청
- 로드가 완료되면 유저가 속한 그룹을 UI에 표시
2. 데이터 로드 요청
로그인이 완료되면 유저의 RemoteConfig 데이터를 로드하도록 요청하는 기능을 만들겠습니다.
2-1 선행학습
2-1-1 플레이어 ID 등록
플레이어의 ID를 RemoteConfig에 등록합니다.
RemoteConfigService.Instance.SetCustomUserID(AuthenticationService.Instance.PlayerId);2-1-2 RemoteConfig 로드 요청
RemoteConfig에 등록된 Player의 RemoteConfig 데이터를 로드해달라고 요청합니다.
이때, 매개변수로 두개의 구조체를 전달하는데 빈 구조체라도 전달해줘야 합니다. 구조체에 대한건 추후에 다룰 예정입니다. 일단은 빈 구조체라도 전달해줘야 한다 정도만 알아두시면 됩니다.
public struct UserAttributes
{
}
public struct AppAttributes
{
}

// 빈 구조체라도 전달해줘야 한다.
await RemoteConfigService.Instance.FetchConfigsAsync(new UserAttributes(), new AppAttributes());
2-1-3 로드한 데이터 얻기
RemoteConfig의 데이터가 로드가 완료되면 Key 이름으로 로드된 데이터를 얻을 수 있습니다.
RemoteConfigService.Instance.appConfig.GetInt("가져올 키 이름");2-2 스크립트 작성
2-2-1 RemoteConfigManager.cs
Use Case Samples\AB Test Level Difficulty\Scripts 폴더에 RemoteConfigManager.cs를 만들고 아래의 코드를 작성합니다.
using System;
using System.Collections;
using System.Collections.Generic;
using System.Threading.Tasks;
using Unity.Services.Authentication;
using Unity.Services.RemoteConfig;
using UnityEngine;

namespace Unity.Services.Samples.ABTestLevelDifficulty
{
    public class RemoteConfigManager : MonoBehaviour
    {
        public static RemoteConfigManager instance { get; private set; }

        void Awake()
        {
            if (instance != null && instance != this)
            {
                Destroy(this);
            }
            else
            {
                instance = this;
            }
        }
    }
}
RemoteConfig 에서 로드한 데이터를 저장할 전역변수를 만듭니다.
        // RemoteConfigManager.cs

        public int levelUpXPNeeded { get; private set; }
        public string abGroupName { get; private set; }
        public string abTestID { get; private set; }
        public Dictionary<string, CurrencySpec> currencyDataDictionary { get; private set; }

        [Serializable]
        public class CurrencySpec
        {
            // 보상 아이템의 Address 주소
            public string spriteAddress;
        }
데이터를 받을 준비가 완료되었습니다. 클라이언트에서 데이터 로드를 요청하는 코드를 작성합니다.
        // RemoteConfigManager.cs

        public async Task FetchConfigs()
        {
            try
            {
                // 플레이어 ID 등록
                RemoteConfigService.Instance.SetCustomUserID(AuthenticationService.Instance.PlayerId);

                // 플레이어의 RemoteConfig Key 값 로드
                await RemoteConfigService.Instance.FetchConfigsAsync(new UserAttributes(), new AppAttributes());

                if (this == null) return;

                GetConfigValues();
            }

            catch (Exception e)
            {
                Debug.LogException(e);
            }
        }

        void GetConfigValues()
        {
            levelUpXPNeeded = RemoteConfigService.Instance.appConfig.GetInt("AB_TEST_LEVEL_UP_XP_NEEDED");
            abGroupName = RemoteConfigService.Instance.appConfig.GetString("AB_TEST_GROUP");
            abTestID = RemoteConfigService.Instance.appConfig.GetString("AB_TEST_ID");
            var json = RemoteConfigService.Instance.appConfig.GetJson("CURRENCIES");
            currencyDataDictionary = CreateCurrencyDictionary(json);
        }


        Dictionary<string, CurrencySpec> CreateCurrencyDictionary(string json)
        {
            var dictionary = new Dictionary<string, CurrencySpec>();

            var currencyDataHolder = JsonUtility.FromJson<CurrencyDataHolder>(json);

            foreach (var currencyData in currencyDataHolder.currencyData)
            {
                dictionary[currencyData.currencyId] = currencyData.currencySpec;
            }

            return dictionary;
        }

        [Serializable]
        public class CurrencyDataHolder
        {
            public List<CurrencyData> currencyData;
        }

        [Serializable]
        public class CurrencyData
        {
            public string currencyId;
            public CurrencySpec currencySpec;
        }
2-2-1 ABTestLevelDifficultySceneManager.cs
로그인이 완료되면 RemoteConfigManager.FetchConfigs() 를 호출해서 유저의 RemoteConfig 데이터를 로드하는 코드를 작성합니다.
        // ABTestLevelDifficultySceneManager.cs

        async Task LoadServicesData()
        {
            // () 안의 비동기 함수를 동시에 실행한다.
            await Task.WhenAll(
                // 경제 데이터를 받아온다.
                EconomyManager.instance.RefreshCurrencyBalances(),
                // 리모트 구성 요소를 받아온다.
                RemoteConfigManager.instance.FetchConfigs()
            );
        }
2-3 스크립트 연결
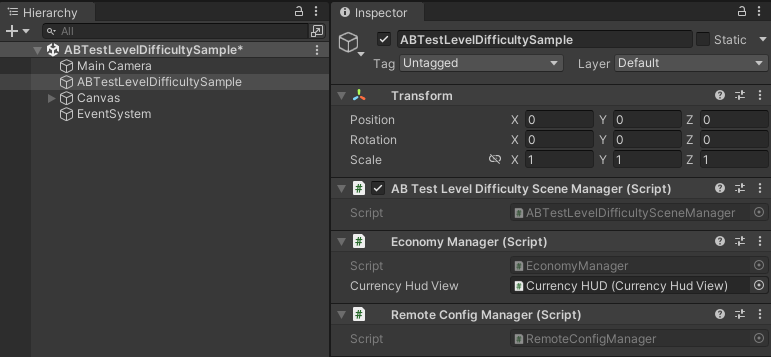
ABTestLevelDifficultySample 오브젝트에 RemoteConfigManager.cs를 추가합니다.
3. 유저가 속한 그룹을 UI에 표시하기
RemoteConfig에서 데이터를 로드가 완료되면 유저가 속한 그룹을 UI에 표시하는 기능을 만듭니다.
3-1 스크립트 작성
3-1-1 ABTestLevelDifficultySampleView.cs
Use Case Samples\AB Test Level Difficulty\Scripts 폴더에 ABTestLevelDifficultySampleView.cs를 만들고 아래의 코드를 작성합니다.
using System.Collections.Generic;
using TMPro;
using UnityEngine;
using UnityEngine.UI;
namespace Unity.Services.Samples.ABTestLevelDifficulty
{
    public class ABTestLevelDifficultySampleView : MonoBehaviour
    {
        [Space]
        public TextMeshProUGUI abTestGroupText;
    }
}
다음은 UI에 로드한 유저의 그룹 데이터를 UI에 표시하는 함수를 추가합니다.
        // ABTestLevelDifficultySampleView.cs

        public void EnableAndUpdate()
        {
            UpdateScene();
        }

        public void UpdateScene()
        {
            UpdatePlayerABGroup();
        }

        void UpdatePlayerABGroup()
        {
            abTestGroupText.text = $"Group: {RemoteConfigManager.instance.abGroupName}";
        }
3-1-2 ABTestLevelDifficultySceneManager.cs
ABTestLevelDifficultySampleView를 전역변수로 추가합니다.
        // ABTestLevelDifficultySceneManager.cs

        public ABTestLevelDifficultySampleView sceneView;
UI를 업데이트하는 함수를 만듭니다.
        // ABTestLevelDifficultySceneManager.cs

        void UpdateSceneViewAfterSignIn()
        {
            sceneView.EnableAndUpdate();
        }
위 함수를 데이터 로드가 완료되면 호출하도록 LoadDataFromServices() 함수를 수정합니다.
        // ABTestLevelDifficultySceneManager.cs

        async Task LoadDataFromServices()
        {
            // -- 경제 구성요소 새로고침 관련 코드 생략

            // -- 서버에서 데이터 로드를 요청하는 코드 생략

            UpdateSceneViewAfterSignIn();
        }
3-2 컴포넌트 연결
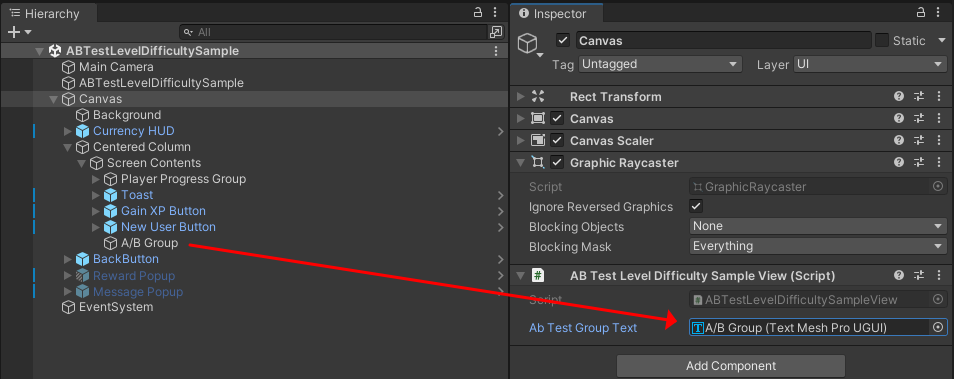
Canvas에 ABTestLevelDifficultySampleView 를 추가하고 A/B Test Group Text 변수에 A/B Group 게임오브젝트를 넣어줍니다.
ABTestLevelDifficultySample 오브젝트의 ABTestLevelDifficultySceneManager 스크립트의 Scene View 변수에 Canvas를 넣어줍니다.

3-3 테스트하기
재생 버튼을 눌러 유저가 속한 그룹이 제대로 표시되는지 확인합니다.

4. 로그아웃 처리
로그아웃과 함께 Group UI를 ""로 처리하는 기능을 만들겠습니다.
4-1 스크립트 작성
4-1-1 RemoteConfigManager
RemoteConfigManager의 전역변수에 저장된 데이터를 초기화 시켜주는 함수를 추가합니다.
        // RemoteConfigManager.cs

        public void ClearCachedData()
        {
            levelUpXPNeeded = 0;
            abGroupName = "";
            abTestID = "";
            currencyDataDictionary = default;
        }
4-1-2 ABTestLevelDifficultySceneManager
로그아웃가 되면 ClearCachedData를 호출하도록 SignOut() 함수를 수정하겠습니다.
        // ABTestLevelDifficultySceneManager.cs

        void SignOut()
        {
            // Note that signing out here signs you out of this player ID across all the use case samples.
            if (AuthenticationService.Instance.IsSignedIn)
            {

                // -- 경제 관련 Clear 코드 생략
                EconomyManager.instance.ClearCurrencyBalances();

                // -- 로그아웃 관련 코드 생략

                UpdateSceneViewAfterSignOut();
            }
        }

        void UpdateSceneViewAfterSignOut()
        {
            sceneView.UpdateScene();
        }
4-2 테스트 하기
재생 버튼을 누르고 Sign In New Player 버튼을 눌러 Group UI가 잠깐 동안 "" 로 표시되는지 확인합니다.
오늘은 여기까지

제 블로그가 만족스럽다면 커피 한잔 값으로 후원을 해주실 수 있어요! 'Unity 자습서 > GamingServices' 카테고리의 다른 글
Gamingservices - ABTestSample #7 Game Overrides 설정 (0) 2023.03.01 Gamingservices - ABTestSample #6 Remote Key 만들기 (0) 2023.02.28 Gamingservices - ABTestSample #5 재화 표시 (0) 2023.02.26 Gamingservices - ABTestSample #4 재화 만들기 (0) 2023.02.25 다음글이전글이전 글이 없습니다.댓글