지난 글 다시보기
[Unity DOTS/따라하며 배우기] - UNITY DOTS - BlobAsset 예제1 뒤끝서버에서 데이터 받아와서 처리
BlobAsset은 공유데이터(다수 Entity에서 읽어와서 쓰는 데이터)에 최적화된 타입이다. 공유데이터는 구조체로 만들어서 사용하는 방법보다 BlobAsset 으로 만들어서 사용하는 것이 좋다. 그러니깐, 여러 Entity에서 공유해서 사용하는 데이터는 BlobAsset로 만들어서 사용하는 것이 좋다.
오늘 알아볼 내용
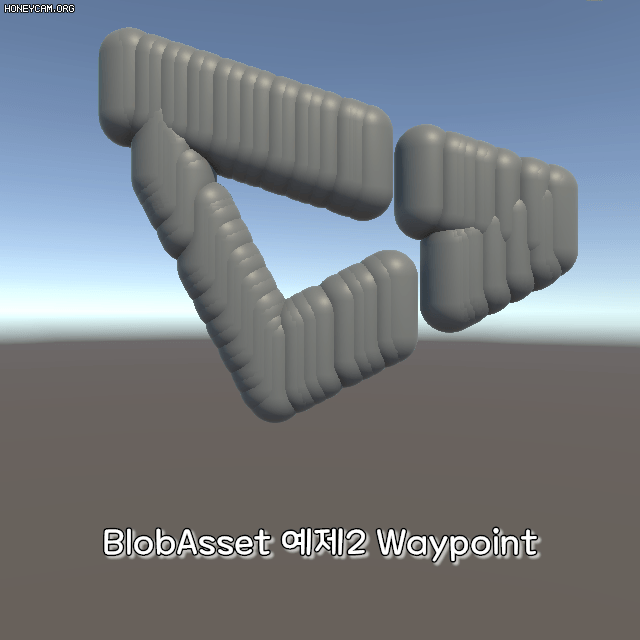
3개의Waypoint를 만들어서 BlobAsset으로 만들고 소환되는 Player Entity에게 연결해서 waypoint를 따라 다니는 간단한 프로그램을 만들 것이다.
Blob Asset 구조 만들기
BlobAsset으로 만들 Data와 BlobArray 구조체를 만든다.
using System;
using Unity.Collections;
using Unity.Entities;
using Unity.Mathematics;

[Serializable]
public struct WaypointData : IComponentData
{
    public float3 position;
}

[Serializable]
public struct WaypointBlobAsset : IComponentData
{
    public BlobArray<WaypointData> waypointArray;
}
#코드 설명
Waypoint를 담을 BlobArray 구조체이다. BlobAsset을 사용하려면 Data와 그 Data를 BlobArray로 만들 구조체 2개가 필요하다.
다음은 위 구조체로 BlobAsset을 건설하는 건설자를 만든다. Authoring 파일을 만들고 이름을 WaypointBlobAssetConstructor로 변경한다. 아래의 코드를 작성한다.
using Unity.Entities;
using UnityEngine;
using Unity.Collections;

[DisallowMultipleComponent]
public class WaypointBlobAssetConstructor : MonoBehaviour, IConvertGameObjectToEntity
{
    // 다양한 Entities가 쉽게 접근하게 static으로 만들었다.
    public static BlobAssetReference<WaypointBlobAsset> blobAssetReference;

    // waypoint를 담을 Transform 배열
    public Transform[] waypointTransformArray;

    public void Convert(Entity entity, EntityManager dstManager, GameObjectConversionSystem conversionSystem)
    {
        // 1. BlobBuilder 메모리 할당
        BlobBuilder blobBuilder = new BlobBuilder(Allocator.Temp);

        // 2. BlobAsset 루트 만들기
        ref WaypointBlobAsset waypointBlobAsset = ref blobBuilder.ConstructRoot<WaypointBlobAsset>();

        // 3. BlobArray 초기화 (몇개를 쓸건지 미리 명시해야 한다.)
        BlobBuilderArray<WaypointData> waypointArray = blobBuilder.Allocate(ref waypointBlobAsset.waypointArray, 3);

        // 4. BlobArray에 데이터 넣기
        for (int i = 0; i < waypointTransformArray.Length; i++)
        {
            waypointArray[i] = new WaypointData { position = waypointTransformArray[i].position};
        }

        // 5. blobAssetReference 메모리 할당 후 참조시키기
        blobAssetReference = blobBuilder.CreateBlobAssetReference<WaypointBlobAsset>(Allocator.Persistent);
        blobBuilder.Dispose();
    }
}
#코드 설명
1~5번은 순서다. 외워야 한다.
public static BlobAssetReference<WaypointBlobAsset> blobAssetReference; 는 다양한 Entity가 쉽게 접근할 수 있게 Static으로 만들었는데 해당 BlobAssetReference가 런타임 중에 가끔씩만 사용된다면 static으로 만들지 말고 Query로 조회해서 데이터를 가져오는 방식이 성능상 나을 수도 있다.
BlobAsset 메뉴얼은 아래 링크 참고
[Unity DOTS/Dots Custom Manual] - UNITY DOTS - BLOB assets 에 대해 알아보자
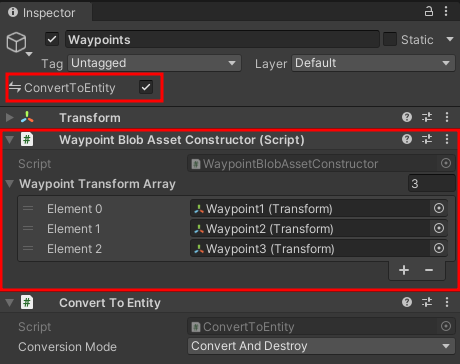
Hierarchy 뷰에서 빈게임오브젝트를 만들고 이름을 Waypoints로 변경한다. Waypoints의 자식오브젝트 3개를 만들고 이름을 Waypoint1~3으로 만들고 원하는 위치에 배치한다. Waypoints의 ConvertToEntity를 활성화시키고 위에서 만든 WaypointBlobAssetConstructor를 추가한다. WaypointBlobAssetConstructor의 필드에 자식 오브젝트 Waypoint1~3을 연결한다.
Player 만들기
PlayerTag를 만든다. DOTS는 Component, System, Entity 구조로 동작하므로 Query 등에서 조회를 하려면 유니티의 기존 Tag가 아닌 Component로 Tag를 만들어야 한다.
using Unity.Entities;

[GenerateAuthoringComponent]
public struct PlayerTag : IComponentData
{

}
다음은 waypoint를 따라 길찾기를 할 때 사용할 Data를 만든다.
using Unity.Entities;

[GenerateAuthoringComponent]
public struct PlayerWaypointFollwData : IComponentData
{
    public int waypointIndex;
    public float moveSpeed;
    public BlobAssetReference<WaypointBlobAsset> waypointReference;
}
#코드 설명
WaypointFollowData에 moveSpeed도 함께 넣은 이유는 위 3개가 System에서 한쌍으로 같이 사용되기 때문이다. 우리가 만드는 System에서 필요로 하는 Component 조합에 따라 각 필드를 어떻게 나누고 합칠지 고민해야 한다.
이에 대한 좀더 자세한 정보는 아래 링크를 참고한다.
[Unity DOTS/Dots Custom Manual] - UNITY DOTS - ICompoentData 에 대해 알아보자.
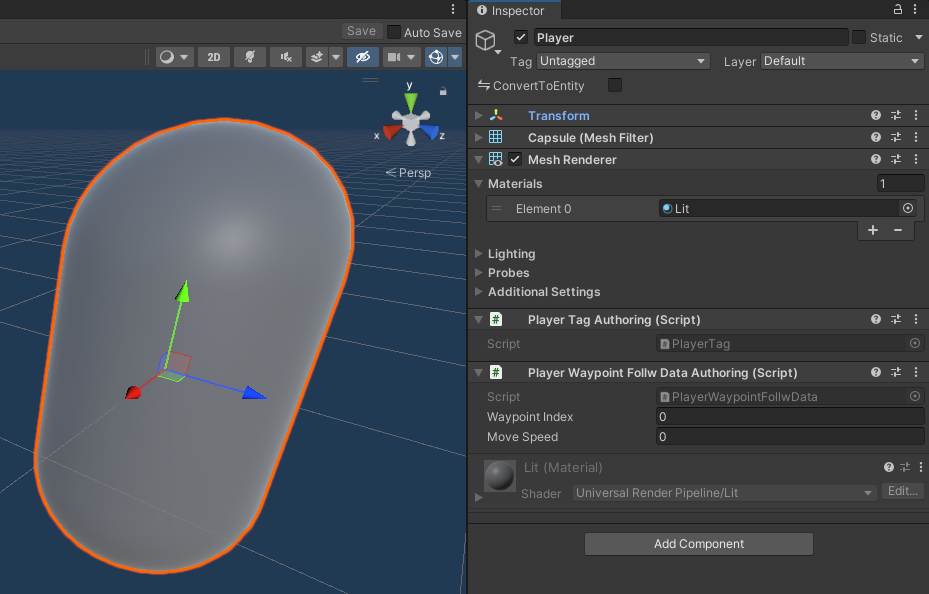
다음은 Hierarchy 뷰에서 3D 오브젝트 아무거나 만들고 이름을 Player로 변경한다. 위에서 만든 두개의 Compoent를 추가하고 Prefab으로 만든 뒤 Hierarchy 뷰에 있는 Player는 삭제한다.
Player Spawner
Spawner Entity에서 Player Entity를 생성하게 만들 예정이다. 먼저 Spawner Data를 만든다.
using Unity.Entities;

public struct PlayerSpawnData : IComponentData
{
    public int spawnCount;
    public float spawnCurTimer;
    public float spawnMaxTimer;

    public Entity Prefab;
}
다음은 Entity로 변환될때 위의 PlayerSpawnData 에 값을 넣을 Authoring을 만들거다. PlayerSpawnAuthoring 를 만들고 아래 코드를 작성한다.
using System.Collections.Generic;
using Unity.Entities;
using UnityEngine;

[DisallowMultipleComponent]
public class PlayerSpawnAuthoring : MonoBehaviour, IConvertGameObjectToEntity, IDeclareReferencedPrefabs
{
    // 80마리의 Player를 0.15f 간격으로 생성할 예정이다.
    [SerializeField] private int spawnCount = 80;
    private float spawnCurTimer = 0;
    [SerializeField] private float spawnMaxTimer = 0.15f;

    public GameObject playerPrefab;

    public void Convert(Entity entity, EntityManager dstManager, GameObjectConversionSystem conversionSystem)
    {
        dstManager.AddComponentData(entity, new PlayerSpawnData
        {
            spawnCount = spawnCount,
            spawnCurTimer = spawnCurTimer,
            spawnMaxTimer = spawnMaxTimer,
            Prefab = conversionSystem.GetPrimaryEntity(playerPrefab)
        });
    }

    // 런타임 중에 GameObect Prefab을 Entity로 생성하려면 DeclareReference로 등록해야 한다.
    public void DeclareReferencedPrefabs(List<GameObject> referencedPrefabs)
    {
        referencedPrefabs.Add(playerPrefab);
    }
}
#코드 설명
Entity 가 런타임 중에 Entity를 생성하는 SampleProject 예제는 아래 링크를 참고한다.
[Unity DOTS/ECS Sample Projtect] - ECS Sample Project #5 SpawnFromEntity
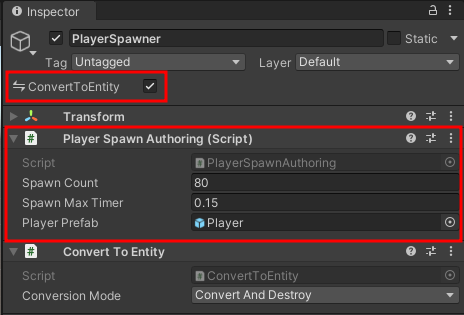
Hierarchy뷰에서 빈게임오브젝트를 만들고 이름을 Spawner로 변경한다. ConvertToEntity를 활성화시키고 PlayerSpawnerAuthoring을 추가한다. Player 프리팹을 연결하고 소환횟수, 소환간격을 입력한다.
System 만들기
1. WaypointFollowSystem
Player가 waypoint를 따라 다니는 시스템을 만든다. 아래의 코드를 작성한다.
using Unity.Burst;
using Unity.Entities;
using Unity.Jobs;
using Unity.Mathematics;
using Unity.Transforms;

public partial class WaypointFollowSystem : SystemBase
{
    // 최신 버전부터 OnUpdate에 BurstCompile을 사용할 수 있다.
    [BurstCompile]
    protected override void OnUpdate()
    {
        float deltaTime = Time.DeltaTime;

        Entities
            .WithAll<PlayerTag>()
            .ForEach((ref PlayerWaypointFollwData followData, ref Translation translation) => {

                // waypointReference 참조시키기
                ref WaypointBlobAsset waypointBlobAsset = ref followData.waypointReference.Value;

                // 이동 관련 로직
                float3 waypointPosition = waypointBlobAsset.waypointArray[followData.waypointIndex].position;
                float3 dirToWaypoint = math.normalize(waypointPosition - translation.Value);
                float3 movement = dirToWaypoint * followData.moveSpeed * deltaTime;
                translation.Value += movement;


                float reachedWaypointDistance = 0.1f;

                // waypoint에 도착하면 다음 Index로 변경하기
                if (math.distance(translation.Value, waypointPosition) < reachedWaypointDistance)
                {
                    followData.waypointIndex = (followData.waypointIndex + 1) % waypointBlobAsset.waypointArray.Length;
                }

                // 멀티스레드에서 병렬로 처리
            }).ScheduleParallel();
    }
}
#코드 설명
waypoint를 따라 이동하며 도착하면 다음 Index로 변경해주는 System이다. 최선 Entities 버전은 OnUpdate 에도 [BurstComplie]을 사용할 수 있다. (관리되지 않는 데이터로만 작동하는 경우만 가능)
다음은 Player를 생성하는 시스템을 만든다. 아래의 코드를 작성한다.
using Unity.Entities;
using Unity.Jobs;

public partial class PlayerSpawnSystem : SystemBase
{
    protected override void OnUpdate()
    {
        float deltaTime = Time.DeltaTime;

        Entities.ForEach((Entity entity, ref PlayerSpawnData spawnData) => {

            if(spawnData.spawnCount > 0)
            {
                spawnData.spawnCurTimer -= deltaTime;

                if(spawnData.spawnCurTimer <= 0)
                {
                    spawnData.spawnCurTimer = spawnData.spawnMaxTimer;
                    spawnData.spawnCount--;

                    Entity playerEntity = EntityManager.Instantiate(spawnData.Prefab);

                    EntityManager
                    .SetComponentData(
                        playerEntity,
                        new PlayerWaypointFollwData
                        { moveSpeed = 3, waypointIndex =1 , waypointReference = WaypointBlobAssetConstructor.blobAssetReference});

                }
            }

            else
            {
                EntityManager.DestroyEntity(entity);
            }

            // EntityManager를 통한 구조적 변경이 있으므로 WithStructuralChange와
            // 메인스레드에서만 작동하도록 Run 으로 실행했다.
            // EntityCommandBuffer를 이용하면 멀티스레드에서도 동작하도록 만들 수 있다. (성능상 더 좋음)
        }).WithStructuralChanges().Run();
    }
}
#코드 설명
위 코드는 최대한 직관적으로 만들려고 EntityManager를 통한 구조적 변경이 있도록 만들었다. 다만 이럴 경우 메인스레드에서만 작동하므로 DOTS의 성능 이점을 얻을 수 없다. EntityCommandBuffer를 이용해서 멀티스레드에서 동작하게 만드는 것이 성능상 더 좋다.
EntityCommandBuffer 예제는 아래 링크 참고
[Unity DOTS/ECS Sample Projtect] - ECS Sample Project #6 SpawnAndRemove
EntityCommandBuffer 메뉴얼은 아래 링크 참고
[Unity DOTS/Dots Custom Manual] - UNITY DOTS - Entity Command Buffers 에 대해 알아보자.
Play를 눌러 테스트한다.
'Unity DOTS > 따라하며 배우기' 카테고리의 다른 글
| UNITY DOTS - State Machine(상태 머신) 만들기 #3 Guard 이동 (0) | 2022.08.06 |
|---|---|
| UNITY DOTS - State Machine(상태 머신) 만들기 #2 Player (0) | 2022.08.05 |
| UNITY DOTS - State Machine(상태 머신) 만들기 #1 개요 (0) | 2022.08.05 |
| UNITY DOTS - BlobAsset 예제1 뒤끝서버에서 데이터 받아와서 처리 (0) | 2022.08.02 |

댓글