- ECS SampleProject #8 EntityPrefab2022년 08월 04일
- 개양반
- 작성자
- 2022.08.04.:41
Hello Cube 부분은 완료되었고 Advanced 폴더에 있는 예제를 뜯어보기로 했다. 해당 기능의 개념보다 예제 자체가 어려운건 건너뛰었다.
이번에 알아볼 내용
이번 글의 핵심은 EntityPrefabReference 라는 것이다. PrefabSpawnerSystem 에서 사용되는 것인데 Unity에서 제공하는 기능으로 Entity를 로드하고 생성하는 것에 최적화된 기능이라고 볼 수 있다.
두개의 GameObject 중에 하나를 랜덤으로 선택해서 Entity로 생성하고 시간이 지나면 삭제한다. EntityPrefabReference 에 대해 ReadMe 에서는 아래와 같이 설명하는데 사실 이해는 안 간다.
더보기이 샘플은 엔티티 프리팹을 참조하여 동적으로 로드하고 인스턴스화할 수 있도록 하는 방법을 보여줍니다.
장면에서 PrefabSpawnerAuthoring 구성 요소에는 프리팹에 대한 참조 배열이 있습니다. 이 구성 요소는 PrefabSpawner 및 Spawner의 구성을 보유하는 PrefabSpawnerBufferElement 및 각 프리팹에 대한 EntityPrefabReference로 변환됩니다.
이러한 참조를 통해 변환된 조립식 자산이 플레이어를 빌드할 때 포함되지만 런타임에는 수동으로 로드하지 않는 한 메모리를 차지하지 않습니다.
샘플은 RequestEntityPrefabLoaded 구성 요소를 엔터티에 추가하고 PrefabLoadResult 구성 요소가 추가될 때까지 대기하여 로드할 참조된 프리팹 중 임의의 것을 선택합니다.
프리팹이 로드되면 프리팹 생성기가 필요한 수의 인스턴스를 생성하기 시작합니다.
로드 요청은 참조 카운트되며 이를 참조하는 RequestEntityPrefabLoaded 구성 요소가 있는 한 프리팹은 로드된 상태로 유지됩니다. 또한 프리팹의 모든 인스턴스는 리소스가 언로드되는 것을 방지해야 하기 때문에 참조도 보유합니다.
샘플에서 PrefabSpawner는 필요한 수의 인스턴스 생성이 완료되면 자체적으로 파괴됩니다.
이것은 또한 RequestEntityPrefabLoaded를 파괴하여 모든 인스턴스가 파괴되면 프리팹이 언로드되도록 합니다.
샘플 인스턴스는 잠시 후 자체 소멸됩니다.
스스로 파괴되는 오브젝트 만들기
이번 글에서 덜 중요한 시스템을 먼저 만들 생각이다.
SelfDestruct IComponentData를 만든다. (생존 시간에 대한 데이터)
using Unity.Entities;

public struct SelfDestruct : IComponentData
{
    public float TimeToLive;
}
게임 오브젝트가 Entity로 전환될때 SelfDestruct 를 전환되는 Entity의 Component가 되도록 하는 Authoring을 만든다.
using Unity.Entities;
using UnityEngine;

#if UNITY_EDITOR // 에디터에서만 동작하도록 만들었는지는 모르겟당
public class SelfDestructAuthoring : MonoBehaviour, IConvertGameObjectToEntity
{
    public float TimeToLive;
    public void Convert(Entity entity, EntityManager dstManager, GameObjectConversionSystem conversionSystem)
    {
        dstManager.AddComponentData(entity, new SelfDestruct {TimeToLive = TimeToLive});
    }
}
#endif
다음은 시스템을 만들거다.
using Unity.Entities;

public partial class SelfDestructSystem : SystemBase
{
    private EndSimulationEntityCommandBufferSystem m_EndSimECBSystem;

    protected override void OnCreate()
    {
        m_EndSimECBSystem = World.GetExistingSystem<EndSimulationEntityCommandBufferSystem>();
    }
    protected override void OnUpdate()
    {
        // 멀티스레드에서 병렬로 처리되는 쓰기 명령을 기록하는 AsParallelWriter()
        var ecb = m_EndSimECBSystem.CreateCommandBuffer().AsParallelWriter();
        var dt = Time.DeltaTime;
        Entities.ForEach((Entity entity, int entityInQueryIndex, ref SelfDestruct spawner) =>
        {
            // 생존 시간이 0 이하가 되면 파괴한다.
            if((spawner.TimeToLive -= dt) < 0)
                ecb.DestroyEntity(entityInQueryIndex, entity);
        }).ScheduleParallel();

        // 명령버퍼를 예약하고 종속성을 전달한다.
        m_EndSimECBSystem.AddJobHandleForProducer(Dependency);
    }
}
#코드 설명
EntityCommandBufferSystem을 이용해서 멀티스레드에서도 구조적 변경이 가능하게 만들었다. 멀티스레드에서 병렬로 처리된 쓰기를 버퍼에 기록하려면 var ecb = m_EndSimECBSystem.CreateCommandBuffer().AsParallelWriter();가 필요하다.
EntityCommandBuffer에 대한 메뉴얼은 아래 링크를 참고한다.
[Unity DOTS/Dots Custom Manual] - UNITY DOTS - Entity Command Buffers 에 대해 알아보자.
EntityCommandBuffer의 심플한 예제는 아래 링크를 참고한다.
[Unity DOTS/ECS Sample Projtect] - ECS Sample Project #6 SpawnAndRemove
Hierarchy 뷰에서 Sphere를 만들고 아래처럼 변경한다.
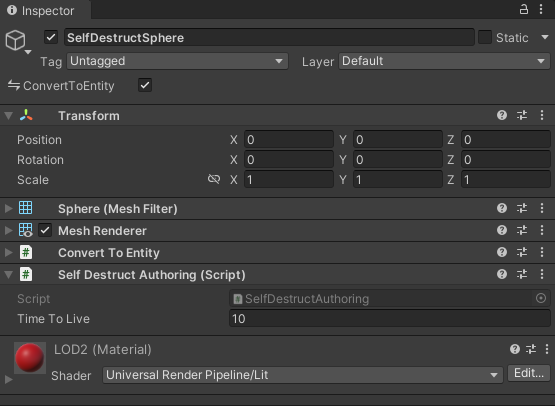
Cube도 만들어서 위의 이미지와 똑같이 만든다. *예제에서는 SampleProject #1. ForEach의 RotatingCube를 사용했는데 뭐가 되었건 상관없다. Prefab 두개가 필요할 뿐이다.
위의 두 게임오브젝트를 Prefab으로 만들고 Hierarchy뷰에서 삭제한다.
런타임 중에 Entity 생성
다음은 PrefabSpawnerBufferElement를 이용한 Entity를 생성하는 것에 대해 다룬다.
1. Component Data 만들기
using Unity.Entities;
using Unity.Entities.Serialization;

public struct PrefabSpawner : IComponentData
{
    public float SpawnsRemaining;
    public float SpawnsPerSecond;
}

// 이번 글에서 주요 주제인 EntityPrefabReference 이다.
public struct PrefabSpawnerBufferElement : IBufferElementData
{
    public EntityPrefabReference Prefab;
}
#코드 설명
PrefabSpawnerBufferElement은 IBufferElementData를 상속받았다는 것이다. IBufferElementData는 간단하게 말해서 동적버퍼인데 지정한 크기 내에서 데이터를 넣다 뺏다 할 수 있는 타입이다.
IBufferElementData 에 대한 상세한 설명은 아래 링크를 참고한다.
[Unity DOTS/Dots Custom Manual] - UNITY DOTS - Dynamic Buffer Component 에 대해 알아보자.
2. Authoring 만들기
Spawner가 Entity가 되면서 PrefabSpawner와 PrefabSpawnerBufferElement를 가지게 만든다.
using Unity.Entities;
using Unity.Entities.Serialization;
using UnityEngine;

#if UNITY_EDITOR
public class PrefabSpawnerAuthoring : MonoBehaviour, IConvertGameObjectToEntity
{
    public GameObject[] Prefabs;
    public int SpawnCount;
    public float SpawnsPerSecond;

    public void Convert(Entity entity, EntityManager dstManager, GameObjectConversionSystem conversionSystem)
    {
        // Spawner 에게 스폰 간격과 생성할 개수가 존재하는 PrefabSpawner 컴포넌트를 추가한다.
        dstManager.AddComponentData(entity, new PrefabSpawner {SpawnsRemaining = SpawnCount, SpawnsPerSecond = SpawnsPerSecond});

        // Spawner 에게 PrefabSpawnerBufferElement buffer 추가
        var buffer = dstManager.AddBuffer<PrefabSpawnerBufferElement>(entity);

        foreach (var prefab in Prefabs)
        {
            // EntityPrefabReference 로 두개의 프리팹을 연결한다.
            buffer.Add(new PrefabSpawnerBufferElement {Prefab = new EntityPrefabReference(prefab)});
        }
    }
}

#endif
#코드 설명
PrefabSpawnerBufferElement는 IBufferElementData를 상속받아서 만들었다. AddBuffer로 데이터를 추가해야 한다. PrefabSpawnerBufferElement에 대한 내용은 테스트할 때 상세하게 설명할 예정이다.
빈게임오브젝트를 만들고 아래와 같이 만든다. PrefabSpawnerAuthoring의 필드에 위에서 만든 프리팹 두개를 연결한다.
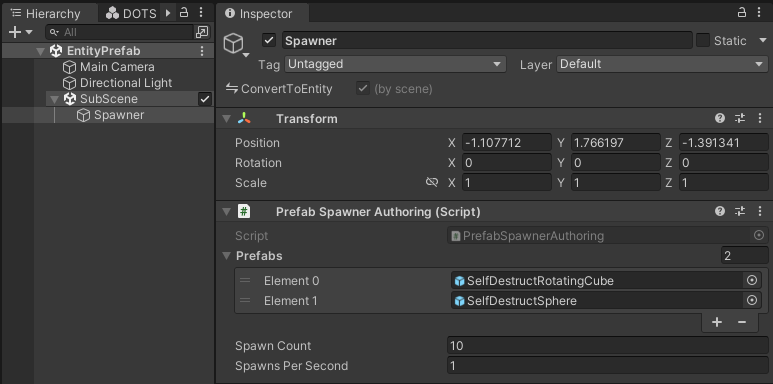
다음 Spawner를 선택하고 SubScene으로 만든다. SubScene을 만드는 방법을 모르시는 분은 아래 링크를 참고한다.
[Unity DOTS/ECS Sample Projtect] - ECS Sample Project #3 Sub Scene
3. System 만들기
아래의 코드를 작성한다.
using System;
using Unity.Entities;
using Unity.Entities.Serialization;
using Unity.Mathematics;
using Unity.Scenes;
using Unity.Transforms;
using Random = Unity.Mathematics.Random;


public partial class PrefabSpawnerSystem : SystemBase
{
    private BeginSimulationEntityCommandBufferSystem m_BeginSimECBSystem;

    protected override void OnCreate()
    {
        m_BeginSimECBSystem = World.GetExistingSystem<BeginSimulationEntityCommandBufferSystem>();
    }

    protected override void OnUpdate()
    {
        var ecb = m_BeginSimECBSystem.CreateCommandBuffer().AsParallelWriter();
        var rnd = new Random((uint)Environment.TickCount);

        Entities.WithNone<RequestEntityPrefabLoaded>().ForEach((Entity entity, int entityInQueryIndex, ref PrefabSpawner spawner, in DynamicBuffer<PrefabSpawnerBufferElement> prefabs) =>
        {

            // ecb에게 spawner 에게 RequestEntityPrefabLoaded를 추가하라고 명령내린다.
            ecb.AddComponent(entityInQueryIndex, entity, new RequestEntityPrefabLoaded {Prefab = prefabs[rnd.NextInt(prefabs.Length)].Prefab});
        }).ScheduleParallel();

        var dt = Time.DeltaTime;

        // 위에서 생성한 entity가 로드가 완료되면 해당 entity에게 PrefabLoadResult 컴포넌트가 추가된다.
        Entities.ForEach((Entity entity, int entityInQueryIndex, ref PrefabSpawner spawner, in PrefabLoadResult prefab) =>
        {

            var remaining = spawner.SpawnsRemaining;
            if (remaining < 0.0f)
            {
                // 더 이상 생성할 인스턴스 없음
                ecb.DestroyEntity(entityInQueryIndex, entity);
                return;
            }

            var newRemaining = remaining - dt * spawner.SpawnsPerSecond;
            var spawnCount = (int) remaining - (int) newRemaining;
            for (int i = 0; i < spawnCount; ++i)
            {
                var instance = ecb.Instantiate(entityInQueryIndex, prefab.PrefabRoot);
                int index = i + (int) remaining;
                ecb.SetComponent(entityInQueryIndex, instance, new Translation {Value = new float3(index*((index&1)*2-1), 0, 0)});
            }
            spawner.SpawnsRemaining = newRemaining;
        }).ScheduleParallel();
        m_BeginSimECBSystem.AddJobHandleForProducer(Dependency);
    }
}
#코드 설명
다시 한번 강조하지만 이번 시간에서 가장 중요한건 EntityPrefabReference 이다. 이 부분을 중점으로 보겠다.
아래의 코드를 살펴보자.
Entities.WithNone<RequestEntityPrefabLoaded>().ForEach((Entity entity, int entityInQueryIndex, ref PrefabSpawner spawner, in DynamicBuffer<PrefabSpawnerBufferElement> prefabs) =>
{

    // ecb에게 spawner 에게 RequestEntityPrefabLoaded를 추가하라고 명령내린다.
    ecb.AddComponent(entityInQueryIndex, entity, new RequestEntityPrefabLoaded {Prefab = prefabs[rnd.NextInt(prefabs.Length)].Prefab});
}).ScheduleParallel();
ecb.AddComponent에서 조회된 entity(Spawner)에게 RequestEntityPrefabLoaded를 Component로 추가하면서 우리가 위에서 연결한 두개의 Prefab 중에 하나를 선택하는 코드가 있다.
RequestEntityPrefabLoaded가 Entity에게 추가되면 유니티에서 만들어놓은 시스템이 EntityPrefabReference에 참조된 Prefab을 로드시킨다.
그다음 코드를 살펴보자
Entities.ForEach((Entity entity, int entityInQueryIndex, ref PrefabSpawner spawner, in PrefabLoadResult prefab)위에서 RequestEntityPrefabLoaded가 추가되면 유니티가 만들어놓은 System에서 Prefab을 Entity로 Create한다. 그리고 Create가 완료되면 Spawner에게 PrefabLoadResult가 자동으로 추가된다. (유니티에서 만들어놓은 System에서 저렇게 로직을 만들어놨다.) PrefabLoadResult에는 Create된 Entity가 전달되는데 이를 통해 Instantiate를 해서 Entity를 생성할 수 있다.
테스트하면서 살펴보기
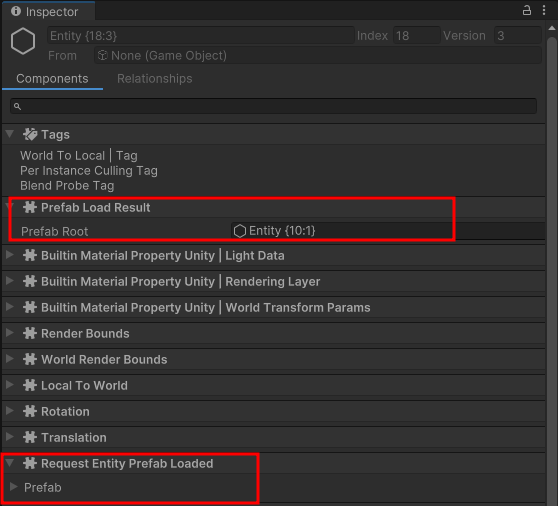
Play버튼을 눌러 유니티를 재생시키면
Instantiate된 Entity에게 RequestEntityPrefabLoaded, PrefabLoadResult가 자동으로 붙어있다.
ReadMe 설명을 다시 읽어보면
로드 요청은 참조 카운트되며 이를 참조하는 RequestEntityPrefabLoaded 구성 요소가 있는 한 프리팹은 로드된 상태로 유지됩니다. 또한 프리팹의 모든 인스턴스는 리소스가 언로드되는 것을 방지해야 하기 때문에 참조도 보유합니다.
이런 이유라고 한다. 공개된 자료가 너무 없고 참고할 글도 없어서 이해는 100% 안된다. 대충 이런게 있다 정도로만 이해하고 있다. 자세히 아시는 분이 계신다면 알려주신다면 감사하겠습니다.
'Unity DOTS > ECS Sample Projtect' 카테고리의 다른 글
ECS SampleProject #7 IJobEntity (0) 2022.07.31 ECS Sample Project #6 SpawnAndRemove (0) 2022.07.30 ECS Sample Project #5 SpawnFromEntity (0) 2022.07.30 ECS Sample Project #4 SpawnFromMonoBehaviour (2) 2022.07.29 다음글이전글이전 글이 없습니다.댓글